Trying to add a picture to your website, but need to change the size? Maybe need to crop out some of the background, or change its orientation, but don't have an image editor on your computer? You can use this free image editor, courtesy of PicMonkey!
Image Editor
Using the editor
PicMonkey offers an in-depth image editing program, with dozens of filters and effects that allow you to do everything from change the size of your image to turning your staff photo into abstract art. But, we will stick to walking you through some of the basic features that you might find useful when adding images to your website.
Opening an image
To start editing your image, click on the "Edit your photo" button. You should see a pop-up dialog box that you can use to search your computer for the image you wish to edit. Once you have located the image, click the "Open" button to start editing!
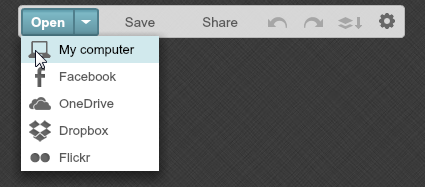
If you want to edit a different image, click on the "Open" drop-down menu from the toolbar at the top of the editor and select "My Computer" to browse through your computer.

Selecting an image that is already online by choosing Facebook or Flickr will NOT update the version of that image that is already online. It simply creates a new copy of it for you to edit and save to your computer!
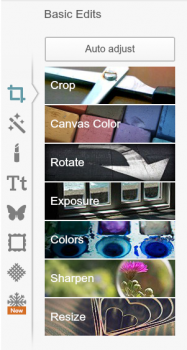
When your image loads, you should see the a File options toolbar at the top of the editor, and along the left side you will find options for filters and effects. This toolbar should default to the Basic Edits tools that will be demonstrated below.

Resizing an image
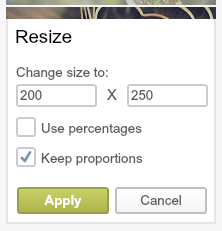
While your image is open, click on the Resize button at the bottom of the Basic Edits toolbar, on the left. You will see a dialog box with the current size of your image, in pixels. If you know the specific dimensions you desire, you can simply type those in the provided boxes. You can use the "Use Percentages" check box to resize your image based on a percentage of the original size. Clicking "Keep Proportions" will resize the image proportionally, preventing the image from appearing stretched in one direction or another.
When you are finished, click "Apply" to apply the changes to your image.

Cropping an image
Cropping an image allows you to remove from it undesired elements, or change the proportions of the image. While your image is open, click the "Crop" button from the top of the Basic Edits toolbar. You will see a dialog box with several options for adjusting the image size (see Figure 1 below). You will also see that your image now has a grid that you can move about the image (see Figure 2 below). You can use the pre-defined sizes and proportions from the dialog box, or move the grid to frame only the portions that you wish to keep.
When you have finished framing the image, click the "Apply" button to crop your image.
| fig. 1 |
 |
| fig. 2 |
 |
Rotating an image
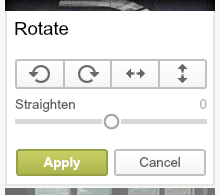
You can change an image's orientation by clicking on the "Rotate" button in the Basic Edits toolbar. This dialog menu has options for several different functions. The circling arrows will rotate your image clockwise or counterclockwise in 90 degree increments. The arrows pointing away from one another will flip your image horizontally or vertically. You can also rotate your image manually by using the slider under "Straighten".
When you are finished rotating your image, click "Apply" to apply the changes.

Saving your image
When you're finished making your changes, click the "Save" button in the File options toolbar at the top of the editor. You'll be prompted to choose a filename and location to which your image will be saved. Now you can upload your image to your website using the file upload feature in your DIY editor!
Want to learn more about using PicMonkey's image editor? Visit their Help page for more information!
 Looking for more information? Check out these Related Pages!
Our Member Services team is available Monday through Friday, from 6:00 AM until 5:00 PM Pacific. You can reach us Toll Free at 866 537-8272 (outside of North America, dial +1 206 458-7700) - or use our Contact Form to send us an email.


